Tuesday, May 21, 2013

Double or Nothing: Jewelry Giveaway - Round Three!

 Round 3 Giveaway - Mini Rose Pendant


Oh, my - how many of you remember this giveaway that was started way back in 2010?  It has taken over 2 years for my followers to double again - this time to reach 84.  I've actually reached 86 through Blogger, and a few more through Google+....but I thought I was waiting for 88 for some reason!  Either way, the double has happened and I've decided to continue with my giveaway - and apologize for the crazy delay.  Having kids and moving twice will do that to a person's schedule!

So without further ado - 

ROUND THREE OF THE DOUBLE OR NOTHING JEWELRY GIVEAWAY!

I have changed the prize a little, however, because my talents have changed and grown over the years.  Now up for grabs is a custom made Mini Rose Pendant of your choice, with the option of a chain:

Round 3 Giveaway - Mini Rose Pendant on Chain

This pendant is hand assembled from carved roses, glass leaves, and fire polished glass beads embedded in epoxy clay in a plated brass bezel setting.  The bail is handmade and the chain is finished with matching beads and a lobster claw clasp.  Chain may vary from that shown - you can choose your length.  Total prize, including shipping, is over $40.  Please give me 1-2 weeks to make your pendant and get it shipped to you.

OPTIONS:
Red Rose OR Coral Rose
Silver Setting with Chain OR Antique Brass Setting with Chain
White Clay OR Black Clay

Please see my Etsy listings for more examples of my Mini Flower Garden Pendants - including the color options listed above.  This giveaway is for a ROSE PENDANT but I have other designs in my shop and I happily accept custom orders. 


ENDS May 27th at Midnight, as timestamped on comments.


To Enter:

Post a Comment below INCLUDING a way to reach you - otherwise I can't notify you if you win!  If you sign in and I can find an email address by following your profile, that works for me!  You don't need to type out your email in the comment box if you don't want to..... 


For Additional Entries:

I want you to choose what you share - the goal is for you to share something you think is worth sharing 

SHARE this post, or any of my posts, or any of my handmade jewelry listings from my Etsy shop, on your platform of choice.  Platforms include Twitter, Facebook, Google+, Pinterest, any Blog, and probably others I haven't heard of....I'm on all of the above except Twitter, so you can find me and like, 1+, or pin, if you wish, but only shares are worth entriesLinks to all my sites are on the top left of this blog. 

Please post in ONE COMMENT where you have shared my blog or my jewelry.  Each platform is worth 1 random slot in the name drawing.  More comments will not get you more entries. 


The Fine Print:
  • NO PURCHASE NECESSARY 
  • You must be 18 years or older to enter 
  • You must have a United States shipping address OR be willing to pay international shipping charges   
  • All entries will be placed in a numbered list and a number will be selected by a random number generator. 
  • The winner will be contacted 2 times to accept the prize - if the winner cannot be reached or doesn't respond, a new winner will be selected.


 Prize - 1 Mini Rose Pendant with Chain

Further "Double or Nothing" Giveaways may be coming in the future - but my followers will have to double again for me to hold it!  So if you aren't already following.....it might be a good idea to do so!

Thanks and Good Luck!
PZ 


Friday, May 17, 2013

Cohesive Jewelry Design: Choosing the Right Clasp

 This bracelet looks cohesive because the clasp is part of the design.

One of the many things my college professor said over and over was to think about your entire design - whether it was jewelry or not.  The focus might be on the lid of a box, or the inside of a bowl, or the pendant on a necklace, but that's no reason to forget about the hinge, or the bottom of a bowl, or the clasp on a necklace.  Maybe your design calls for a basic hinge, or a smooth bottom of the bowl, or a simple clasp -

 This simple toggle clasp complements the rest of the bracelet design.

- but maybe that basic hinge would look better with some decorative cutouts or replaced with a more decorative hinge.  Maybe the bottom of the bowl has a surprise for the curious such as a saying or a carving.  Maybe the plain lobster claw clasp would better compliment the rest of the necklace design if it was larger and dressed up with beads, or if it was replaced with a themed/decorated toggle clasp, or if it was handmade from matching beads, wire, or other material.

This handmade clasp is simple, but ties in with the rest of the design well.

Think about your design and what would make it a truly cohesive piece.  A cohesive design will look complete and balanced - the clasp will compliment the rest of the piece instead of looking out of place.  If your design looks off or unfinished, try a different clasp.  You might be surprised at how often a different clasp makes a big difference to the overall design! 

This clasp was chosen first, as the focal point, with the rest of the design following.

I'm not saying that every necklace needs a big, bold, and/or colorful clasp.  Sometimes a simple chain and clasp is all that is needed.  A hidden clasp can add a bit of mystery.  Some designs can be clasp free, and some clasps demand a prominent place in the front and center!

One type of "hidden" clasp - I used snaps behind the pendant.

So before you grab one of your go-to clasps for your current project, take a moment and really look at your design.  Will this clasp compliment and complete your design (make a cohesive whole)?  Or will your finished piece look off-balance or like it's missing something?  It's worth it for yourself and your work to take the time to finish your piece right - even if that means setting it aside for awhile until the designs resolves itself!  Honestly, I do this quite often!  Even if I've sketched up my design beforehand, sometimes as I'm nearing the end of a project, I realize my plan isn't going to give me a balanced, cohesive design. 

Complementary handmade clasp - ties in with the overall design.

Of course, I didn't always take my professor's advice!  Many of my older designs have whatever clasp I had on hand.  I tell myself it was because I was fresh out of college and didn't have a lot of money to spend on nice clasps (but that wasn't true - I kept buying beads and tools!), but the truth was I didn't see the point in thinking about the clasp. 

Same necklace with a poor clasp choice (left) and a more polished clasp (right).

Here's an old necklace design of mine (above, left) that I still really like wearing, but I wanted it to look more complete, finished, professionally made.  So I revamped the clasp from a basic barrel clasp to cones ending in a toggle clasp (above, right).  Not a huge difference, perhaps, but I would have been a little embarrassed if someone had asked if I had made it before the change.....while now I'd happily say, "Yes!".

Close-up of the old clasp (bottom) and new clasp (top).

A complementary clasp doesn't have to be expensive or showy (though it can be!).  And you can always make your own - go ahead and try it.  There are many free tutorials out there for making your own clasp - beaded, wire wrapped, hammered sheet, ribbon, leather - so many options!  (If you don't know where to start, try The Beading Gem.)

Happy Creating!
PZ

Monday, May 13, 2013

Michaels Coupon - Friends and Family Time!

I also work at Michaels part time as a jewelry instructor (my class page on Facebook) - and as such, I get a few perks (other than teaching)!  One is the yearly Friends and Family Coupon - which I get to share with you all!

This is good for this week - so if you have been eying something but needed a little more savings, here's your chance!  Link to the advertisement/coupons - there are more coupons available, too, after you follow the link!


Happy Creating!
PZ

Thursday, May 9, 2013

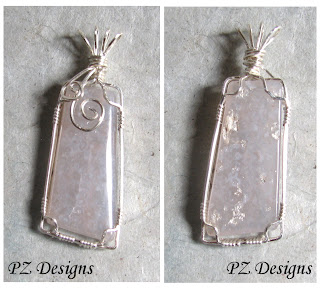
My First Wire Wrapped Cabochons

It is so exciting to try a new technique - I've had wire wrapping cabs on my list for some time now and finally bought some square and half round wire and went at it!  Now, this isn't my first time wire wrapping, I've wrapped a lot of beads and even some polished rocks, but this was taking it to the next level.

 My 1st wire wrapped bezel setting - a little rough, but the right idea!
This is probably some type of agate, but it might be a fossil....

Overall, I'm pretty pleased with how both pendants turned out.  The first one (the long rectangular one) doesn't fit as nicely as I'd like, and I marred the wire pretty badly at the corners, but the 2nd one (the circle cab) is lovely!  Neither cab is in perfect condition as they are practice stones.  I'll probably still make them into full necklaces eventually, and after re-wrapping the first one with unmarred wire, but I didn't want to nick up expensive cabs as I practiced.....

My 2nd wire wrapped bezel setting - I love how this turned out!   
And it looks more polished, too....I think the stone is crazy lace agate.

I didn't follow one tutorial, per se, but I combined a couple as needed for my attention span, skill level, and style.  The Beading Gem has a great list of tutorials already, and the two I used were the first 2 she listed, here:  How to Wire Wrap a Cabochon.  The only tutorial I'd add to this list is by Eat Breathe Design here:  Wire Wrapped Bezel for Cabochons - it's less traditional, but great for those who love crochet, knitting, or viking knit styles.

I know you can wire wrap with round wire and different gauges of wire, and each type and gauge is great for different projects, looks, and sizes of cabochons.  If you want to make similar settings as I have made here, I suggest starting with square and half round wire in 20 or 21 gauge.  Also start with something affordable, like plated or enameled copper wire.  I hate waste, but I have to admit that new techniques take practice to perfect and there will be waste!  Once you know what you are doing, then move up to sterling silver or gold filled wire, or try out some round wire!

Happy Creating,
PZ

Wednesday, May 1, 2013

Turned Wood Pendants by Make-A-Few

Make-A-Few is my brother's woodworking shop - he's always expanding, but currently he makes cedar chests and turned wood creations.  Recently he got a new toy, an off-center jig, and started making wood pendants!

Lucky me - I get to string the pendants!  I've seen several very nice wood turned pendants strung simply on leather cord or with a small accent bead.  Since I like that look, too, some of his pendants will be strung like that....

But these pendants are special to me, and I think they deserve special attention.  So I have also come up with plans for wire wrapped accents, special focal points, and beaded inlays....

Here's a preview photo with the 1st three pendants, soon to be available in my Etsy Shop, PZ Designs:

Three of Make-A-Few's wood turned pendants, strung by PZ Designs (me).
Left to Right:  Wire wrapped accent on beech; Blue accent bead with butternut; 
Focal point inlay on hickory (my personal favorite).

These pendants are LARGE at 2-3 inches across.  While I might bring in more beads for some of them, I mostly think their large size is statement enough, plus I don't want to detract from the awesome, natural splendor of the wood!

For more about Make-A-Few, please visit his Shop or his Google+ page.  He's taken custom orders in the past, so please contact him if you are interested in unstrung pendants for yourself.

Thanks for stopping by and
Happy Creating,
PZ