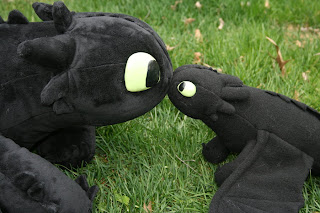
Last year, my family watched "How to Train You Dragon" by Dreamworks for the first time - we all loved it! It's a great story with fun characters. The main characters, Hiccup (a boy) and Toothless (a dragon), are very endearing. So when I found a tutorial on how to make my very own Toothless plushie, I had to try it!
The tutorial I found and used is by
Katy-A on DeviantArt. It's available
HERE. This tutorial has kindly been provided for free and Katy-A has requested that it be used for personal use only - the pattern and resulting plushie are not to be sold or otherwise redistributed for profit!
Katy-A's Toothless and Toothless Clone...
There are a couple tutorials out there, but I like the look of this dragon the best. Individuals experienced in sewing could change the pattern to suit his/her needs, while beginners can muddle through it without too much trouble. I'm in the middle, made a few adjustments, and managed to get a cute dragon out of the process in only a few hours - even with hand-stitching some parts!
Here's my Toothless, who now belongs to my daughter and goes everywhere with her!:
A few tips when making your dragon:
1) Read the instructions a couple times while looking at the pattern pieces - understand where everything is going before you start cutting. Check out this helpful
explanation of the head, too, by
gaernavi.
2) Consider using a double sided material (I mean a material with the same pattern on both sides - there is no "right" side) such as felt for either the entire dragon or for 1-sided pieces such as spikes on his back and claws. It's difficult to turn these small pieces right-side out if you use 2-sided material (material with a right and wrong side) - especially on a small dragon like I made.....
3) PIN your pattern to your fabric. And PIN your fabric together when sewing! I used a soft velvety material - it travels as I stitch, so it was very important to pin the pieces together to keep them aligned correctly.
4) Depending on the size of your dragon, consider stuffing the head "tentacles" and feet before attaching them to the body. Also stuff the tail tip before completing turning him right-side out. Larger dragons might be easier to stuff when completed than small ones.....
5) I suggest sewing the entire dragon closed, and then ripping out part of the seam for turning him right-side out and stuffing him. However, no matter if you rip out the seam or leave it open, DO reinforce either side of the opening with extra stitches. Your pulling a complete dragon out of that hole and it stresses the seams a lot! Closing him up will probably be hand-sewing - consider leaving a seam on the bottom open so it's not always visible when your dragon is displayed or played with.
6) I also suggest using safety eyes over sewing on fabric eyes. They look more real, they are super easy to install, and the finished product is more streamlined. If you want cloth eyes, consider cutting out eye holes and sewing them on from the inside, just like another limb, instead of on the outside where your stitches will show. If you want embroidered eyes, it takes a little more planning to get them on before assembling the head.....and I'm not sure how to make certain they are straight!
7) I used felt inside the wings to make them a little stiffer - fabric backing would also work. Some people choose to add a type of armature to the wings to make them poseable. I chose not to add wire as this was a toy for a small child, not a collector. If you do use wire, consider something like pipe cleaners and fold the tips over, so the wire tips are facing inward and a loop is facing outward. This will be safer, but also prevent the wire from pushing through the fabric.
Your 1st plushie will be cute, but you'll probably notice some errors. Consider making it a small one with thin/easy to sew fabric, a tester for the pattern if you will, and then make a larger or nicer version next. I know this is an extra step, but it'll pay off in the end! The 2nd plushie will go faster and smoother, and you might just make some adjustments to make your dragon more unique and perfect for you, as well.
My next project is a giant Toothless plushie to double up as a floor pillow! I think it'll go smoother though maybe not faster and it'll be easier too because of the large size of items to be sewn. No more hand-sewing dragons for me!
Enjoy!
Happy Creating,
PZ


