Friday, January 24, 2014

Detour Ahead: DnD Miniatures!


I started my first DnD game last year, and also painted my first minis.  For Christmas I received a new little pile of minis, and I just have to share what I've done so far!  While they don't compare to the Reaper contest pieces (those are so amazing - details like patterns on fabric and facial scruff, oh my!), I'm still proud of them and my progress. 

My first 2 minis were painted for friends - A halfling rogue and an elf ranger:

Reaper Bones Mini - Hellakin Goregutter Model

Reaper Bones Mini - Callie, Rogue Model

My next 2 minis are for me - a sea lion (water elemental) and a human cleric (my character!):

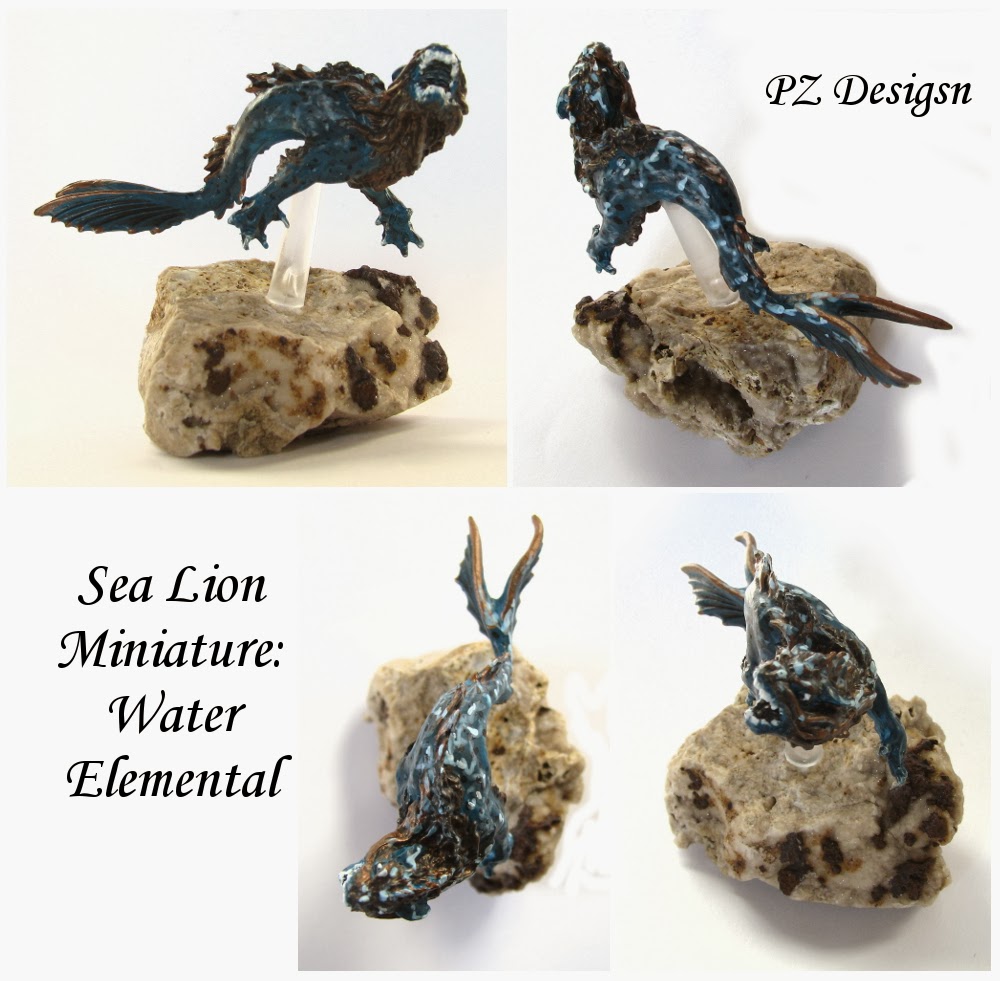
Reaper Bones Mini - Sea Lion Model

Reaper Bones Mini - Kyra, Iconic Cleric Model

If you aren't familiar with anything that I'm saying, I'll try to put these minis in perspective!  The halfling rogue is about 1/2 inch tall; the sea lion is under 3 inches long! 


More minis are coming - I'll probably post again when I have several to show again, and after I've made some more progress on my metalworking for the new year!

If you want to try your hand at painting this fun tiny figures, fine brushes, model paint, and a magnifying glass are a must! 

Happy Creating,
PZ

Friday, January 17, 2014

Custom Pieces - Designed for You!


While I love making jewelry that I've designed just because I can, I REALLY love making special pieces for a person, whether I know them personally (family and friends) or not (customers)!  I love custom requests - to use a certain type of bead or gemstone, color combo, style, technique..... The challenge is grand and the added stress is worth it because the satisfaction of a happy customer is priceless.

Custom Sky Blue Topaz and Sterling Silver Ring

I had a couple custom requests at the end of last year and this ring is one that I'm truly proud of - I took an older simpler spiral design and made it unique while keeping the same feel to the piece.  It's made from sterling silver wire and sky blue topaz.  The customer seems very happy, too!

Gabrielle's Neutral featuring gemstone focal and faceted gemstone accents.

My sister and I often shop for beads together over the holidays, or really whenever I'm in her neighborhood.  We both pick out beads, and then I take them all home!  She was wanting some longer necklaces in neutral colors, and this is one of them that I've completed (2nd design of the New Year!).

Gabrielle's Turquoise featuring dyed druzy beads with pink accent  and a simple beaded chain.

She is a bright, fun person and couldn't be pulled away from some bright turquoise druzy beads - so not all her new necklaces are neutral in color!  This was my first design of 2014, but I really like them both.

And I still have more beads from her so I can happily keep designing for another couple weeks.....

Happy Creating,
PZ


Friday, January 10, 2014

WINTERWOOD: Custom Copper Panel Sign

 Winterwood - Copper Panel Sign.  All handmade from the design to the metalwork to the wood frame!
The last several months of 2013 were spent in cahoots with family and friends making this fabulous custom copper sign as a surprise for my parents.  They started building a new homestead on the family farm, and we wanted to give them a custom sign for the property.  My sister, Tessa, got us together on the project and designed the panels; my brother, Caleb, designed and made the frame; I offered to do the metalwork in copper instead of having a laser cut steel sign.  It's completely handmade and awesome - mom and dad were thrilled with it!

My sign supports - Dad and my husband.  Sign is 2' 10" x 4' 4" with the frame.

Here's the short version of the process, heavily skewed toward the metalwork (since that's what I did), involved in making this 2' x 4' sign:

  1. Find a source for large sheets of copper in the thickness you want.  I suggest 16-18g for such a large project.  I found the best prices at Storm Copper Components, Co
    My 3 copper panels - all shiny and blank!
  2. Draw the design to scale, on thin paper.  Check the design for weak spots/potential problem areas, perform necessary edits, and make sure panels and pattern are square. 
  3. Adhere the final design to the copper panels (rubber cement is perfect for this - it holds the pattern in place but removes cleanly).  
    Edited design drawn on thin paper and adhered to the panels - ready for sawing!
  4. Mark all areas that need to be pierced and center punch (to keep drill from sliding) - you don't want to accidentally pierce solid areas.  I center punched all corners and points to make it easier to manage the saw blade. 
  5. Drill.  Use as small of a drill bit as possible - a flex shaft or dremel tool is handy here!  Wear safety glasses - you will most likely break a bit or four.....Drill from the front to the back so the burrs are on the back.
  6. Remove burrs.  Burrs will catch your saw blades and usually cause them to break.  I used a power sander on the backside with rough grit sandpaper (100 grit) to remove burrs.  THIS WILL LEAVE DEEP MARKS so another technique might be better here for you.  I eventually sanded the entire back like this - it leaves a nice random pattern that (helpfully) obscures any additional scratching that may occur.
    Detail showing drill holes and some sawing.  Look at all those holes around the antlers?!
  7. Saw.  Finally, the fun part!  I used 3 sizes of jewelers saws to hand saw these panels (2.5 inch, 6 inch, and 12 inch).  With a good workspace and technique, the copper cuts like butter (okay, maybe frozen butter....).  
  8. Hammer/Texture.  If desired - I textured the trees.  If the copper is tarnishing, you should clean up the tarnish with steel wool or fine sandpaper first.
  9. Finishing.  This is my least favorite part - use fine files, sandpaper, steel wool, and/or flex shaft/dremel tools to clean up lines, remove scratches and tarnish, and, well, finish the piece!  Start with the back and then move to the front - this means the front will be the most pristine.  Wearing gloves during the final sanding/polishing stage will not only keep your hands cleaner, but it will keep hand oils off the copper, slowing down further tarnishing/etching on the surface.
    Details - Whitetail Deer, Tree textures and a Heron, Turkeys, and a Black Bear.  Finished and clear coated.
  10. Clear Coat or other surface treatments.  Other treatments include flame coloring, a variety of patinas, painting, or leaving it bare for the elements to alter over time!  I chose to keep the sign shiny copper and needed a clear coat to prevent tarnishing.  Everbrite has 2 solutions for copper - I used ProtectaClear and was very pleased with how it turned out!  Follow their preparation and safety directions very carefully for the best result. 
  11. Mount and Hang.  We mounted the panels in an all wood frame, secured with bolts.  It will be hung in a few months, as the exterior of the new home is completed.
That's it in a nutshell!  I worked the equivalent of 2 hours everyday for 2 months to finish the copper panels.  The drawing took my talented sister less than a week, I believe, and I'm not sure how much time was spent on the frame - but I know it included harvesting the wood!  Total, that's over 120 hours spent on this project!

The finished sign all ready for hanging!

I'm glad to be done, but I loved working in metal again and I have additional project lined up for the New Year - I'm thinking smaller metal artworks for indoor decor.....

To see more of my families' works, please visit their websites or contact them through these pages:

Tessa Shadis - Ravens Aerie on DA

Caleb Shadis - Make-A-Few Etsy Shop

Larissa Shadis - Candid Creations on DA

Happy Creating!
PZ

Sunday, January 5, 2014

Button Dolls & Ornaments

 Our Button Dolls and Ornaments!

Over the holiday break my family often tries new crafts - this Christmas we tried making some button doll ornaments!  The original pattern is from Diane Fitzgerald's book "Diane Fitzgerald's Favorite Beading Projects" - I found the book at my local library and found the book to have beautiful, fun, and simple projects in it, unlike some of her other books that are for the more experienced beader.  This was one project that I thought my daughters would enjoy with me - my sisters and mother had fun too!

Diane's Book and 1 of her Button Doll Ornaments
 
I loved the inspired designs of my sisters - one made a little girl with a bell and the other made a boy with a yoyo and a dog!

 Button Girl with Bell

 Button Boy with Yo-Yo & Dog
 
We also found that you can make the dolls without a hanger if you want a true doll instead of an ornament.  My girls loved these - I let them pick out the buttons to use and they chose larger buttons for the feet!

Button Dolls without a Hanging Loop
 
We just used old buttons that my mother had saved for years - this is a great project for using up loose buttons - each doll uses over 30 buttons!  You can also buy button kits and jars of buttons at craft stores - or find bargain collections at garage sales.  I personally loved the look of the old buttons - we found some really neat designs that were fun to incorporate as hats, skirts, hands, and toys!

I'm not going to give a tutorial on these adorable dolls - that's Diane's job!  Please purchase or borrow a copy of her book for detailed directions.  If that's not your style, then just go for it!  We didn't follow her tutorial - we made it up as we went!  If we hadn't, my sister may not have tried to make that cute dog.....

Happy Creating,
PZ