
A triangle weave collar style necklace variation:
This necklace sports an embellished edge as well as decorative fringe elements.
I learned the basic, single row triangle weave with seed beads. My first necklace has survived the years and I occasionally still wear it:

The basic triangle weave (single row): My 1st necklace with this stitch! (above)
& a close-up of the basic weave (below)


An embellished triangle weave collar style necklace:
The clear beads are the basic stitch, while the blue beads form the embellished edging

Another embellished edge triangle weave collar (above) & example of adjustable clasp (below)

PZ Designs Basic Triangle Weave Tutorial: Single Row, No Embellishment

Please click on the above image for a larger version!
Additional Tutorials:
Beading Daily: Learn Triangle Weave - use bugle beads & add a 2nd (or 3rd!) row

Beading Daily Tutorial
Bead Jewelry Making: Triangle Weave - use seed beads singly for a different look
Example of a finished piece using this technique: Black Triangle Weave Bracelet

Black Triangle Weave Bracelet
Around the Beading Table: Triangle Weave Band - a crystal bracelet tutorial

Triangle Weave Band
Around the Beading Table jeweler Deborah Roberti seems to enjoy using the triangle weave in her designs. She has several more tutorials for purchase that also feature the triangle weave, such as the Geometric Obsession Bracelets.

Geometric Obsession Bracelets
Around the Beading Table: Hana-Ami Motif - similar to the Beading Daily tutorial, but create wheels with the triangle weave instead of rows.
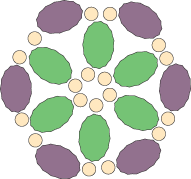
Hana-Ami Motif
These wheels can be combined in various ways for stunning designs!

Crystal Wiggles Bracelet - Hana-Ami Motif Option
Several examples are shown at the end of the tutorial, and here is another: Pinwheel Bracelet.

Pinwheel Bracelet - Hana-Ami Motif Option
I'd also like to showcase the work of jeweler and artist Laura Shea, who regularly uses the triangle weave:


(also available as a kit)

Stained Glass Triangle Cuff - embellished (double layered) triangle weave
While I love the triangle weave for its ease and nostalgic memories, it looks like I've got some exploring to do with this stitch! I hope you have enjoyed reading and learning about this weave and that you try it out for yourself. As you can see, some very extravagant designs can be accomplished from this simple and easy stitch!
Happy Creating,
PZ
So I have never made a piece of jewelery in my life but now I need to make a necklace for a costume! I think this tutorial will be able to help me and it makes it seem pretty easy. Here is the necklace I am looking to make: http://www.worldbiography.net/celebrity/lynn-collins-dejah-thoris.jpg
ReplyDeleteAny tips? I would definitely have to make modifications; do you have any other tutorials that would be better suited for this piece? Thanks in advance!
my apologies for not seeing this way sooner! hope you were successful. I'd actually have made this one on wire to keep this shape. Memory wire for the collar and eye pins for between. my tutorial is for a much smaller triangle choker!
Delete