Friday, July 26, 2013

Tutorial: How to Remove Foil Backs from Swarovski Crystals


Some of you may ask why you'd want to remove the foil back from a crystal, especially one as nice as a Swarovski one!  My answer to that question is this:  I'm making a suncatcher and I want the sun to come through the crystals - and the shape, cut, color, and hole number that I wanted was only available at the time with a foil backing, from Swarovski.

Bumbershoot Designs and Supplies has a nice tutorial on removing foil backings from crystals using salt and vinegar.  I thought this would work with any crystal, but the tutorial really is for vintage crystals.  If you want to check it out:  How to Remove Foil Backing from Vintage Glass Rhinestones and Cabochons.

After getting the crystals, I found out that Swarovski does such a great job applying the foil backings that they are very difficult to remove!  Apparently Swarovski adds the foil during manufacturing and also applies a sealer over everything.  This is great if you want backed crystals, but not so good for me.....

A little more research and I found this article from Benjamin's Crafts:  Removing foiling from Swarovski Crystal.  While helpful to some, I didn't want to buy harsh chemicals, let alone use them, nor did I want to pay someone to remove them for me.  So I went a middle route.

MY TECHNIQUE 

Please note that I used a tester piece and I'm glad I did!  Removing the foil from a crystal can damage the crystal (as you'll see below) and/or change the crystal color - so please be careful and test at least one crystal before proceeding!  

First - know that there are 3 layers to the foil backing.  There is the sealant, the copper foil, and the silver mirror.  This is important to recognize because each step will remove a different layer!

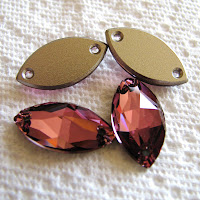
Swarovski flatback crystals with foil backing intact.

1) REMOVE THE SEALANT - Take fine sand paper and scratch the sealant.  This allows the vinegar solution to penetrate the sealant to work on the next 2 layers.

 Sanded crystals next to unsanded crystals.  
Left photo = good sanding.  Right photo = too much sanding.
 
  • PLEASE be careful here - do not press too hard, check after each pass, and use a tester crystal!  Scratch too deeply and you will scratch the crystal (I know, I did this...see above photos)!  You will see the copper foil show through - stop here!  If you scratch through to the silver layer, you are VERY close the scratching the crystal.  
 
Sanded crystal.
Bottom half shows copper foil through sealant.   
Top half shows silver mirror.
 
  • I used 320 grit sandpaper.  Between 280-400 should work.  280 is coarser - be more careful!  400 might need an extra pass or two.
  • Lay the sandpaper on a flat surface and draw the crystal down the paper while holding both completely flat.  Only draw it down 2-4 inches before checking.  Twisting or angling either will result in deeper scratches along the crystal, possibly going to deep into the foil and scratching the crystal surface.

2) REMOVE THE COPPER FOIL - Make the dissolving solution and place the crystals in it for several hours.

Crystals soaking in the salt and vinegar solution.

  •  Solution:  salt and vinegar.  
    • Any salt and vinegar will work.  Coarse/kosher salt is often suggested to help scrub off the foil.
    • Pour enough vinegar to cover the crystals.  Add enough salt so that some remains undissolved.
  • Soaking may take several hours.  I soaked mine overnight and then some. 
  • Remove the crystals from the solution and rub with the salt, a soft cloth, or your fingernail (I used my nail - the point is to use something that won't scratch the crystal).  The copper foil should chip/peel away. 
  • TROUBLESHOOTING - If nothing happened, try the sandpaper again.  If a lot of copper remains, soak again, possibly overnight, again.  Fresh vinegar may help.

3) REMOVE THE SILVER MIRROR - Sometimes the silver mostly comes off with the copper - then you are nearly done!  If more than 1/4 of the silver remains, soak again.  You may need to add fresh vinegar.  A few hours worked for me - the silver was flaking off in the solution before I even re-rubbed them.  

Crystals after soaking and rubbing - various amounts of silver remain on the crystals.

4) RINSE and POLISH - Stubborn silver remaining on the crystal can be cleaned off using a soft polishing cloth.  I used a Sunshine polishing cloth and it worked great.  Other cleaning solutions may work as well - use something mild that is meant to remove tarnish. 

A polishing cloth will remove the remaining silver, leaving a lovely foil-free crystal behind!

5) Enjoy!

 
De-foiled crystals ready for my suncatcher!

FOR SCRATCHED CRYSTALS - Don't throw these away!  These damaged crystals can be saved and used in other designs.  I took my scratched crystal and scratch it some more!  WHAT?!?!?  Just check out the photos - using a fine grit sandpaper (320 again), I uniformly scratched the back of the crystal.  The result is a matte back and a slightly milky look to the crystal from the front.  While this crystal won't work for my suncatcher, it will work in other jewelry designs!

Re-sanded flatback crystal (bottom crystal in right photo).  
The original scratches are sanded out, leaving a smooth matte surface on the back.
 
Happy Creating!
PZ

Friday, July 19, 2013

Bead Hoarders Blog Hop - The Reveal!

Today is the big reveal for the Bead Hoarders Blog Hop, hosted by Lori Anderson of Pretty Things!  A couple weeks ago I posted teaser photos showing the focal beads (below) I had chosen for this destash challenge.  This week I'll show my finished projects!

My chosen focal beads for this destash challenge!

I've had a busy summer having fun with my family (yay!) and was overzealous in my selection of 4 focal beads for 4 projects for this challenge!  I've completed 1 project to my satisfaction (pink quartz), and another is 3/4 done (orange agate) - I say 3/4 done because it is missing something and I haven't figured out what yet!  I have accent beads picked out of the last 2 focals (black oval & yellow/green/brown rectangle), but no overall design yet....

My first Challenge piece - I titled this necklace "Caribbean Sunset"!

First up, my completed design!  The pink quartz focal was from my long hoarded stash, as were the glass accent beads!  I wrapped each beaded link and made the hook and eye clasp.  Total length is 20 inches.  I'd thought about adding some dangles to the design, but I think the patterns in the glass and focal beads is sufficient.  "More isn't always better, sometimes it's just more!"  (From Sabrina, one of my favorite movies!  I like the newer version with Harrison Ford....)

Caribbean Sunset Necklace - shown on chopsticks as a visual size reference.

Second up.....nothing!  Unfortunately, time and my computer have been my enemies.  I haven't finished my other projects, but I will and I'll still post photos of them in the future!  Also, my computer is on the fritz, so even if I finish the next design in time (I have a couple days as I write this), I can't upload the photos to show you right now.... BUT you can continue the blog hop and see more designs by other talented creators by following the links below (I'm number 78 of 167):

1.  Lori Anderson, Pretty Things
2. Nancy Dale, NEDBeads
3. Roxanne Mendoza, Roxi Designs
4.  Melissa Trudinger, beadrecipes
5.  Rana Lea, Rana Lea Designs
6.  Perri Jackson, Shaktipaj Designs
7.  Rita Avila, Jewel School Friends
8.  Linda Anderson, From the Bead Board
9.  Sharon Palac, Sharon's Jewelry Garden
10.  Erin Guest, Renlish


11.  Joan Williams, lilruby jewelry
12. Diane Hawkey, Diane Hawkey
13.  Jo-Ann Woolverton, It's a Beadiful Creation
14.  Sue Kennedy, SueBeads
15.  Lisa Cone, Inspired Adornments
16.  Kari Asbury, Hippie Chick Design
17.  Nichole Byers, Nichole Byers
18.  Lori Jean Poppe, Adventures in Creativity
19.  Linda Landig, Linda's Bead Blog and Meanderings
20.  Lori Schneider, Bead Addict


21.  Molly Alexander, Beautifully Broken Me
22. Cece Cormier, The Beading Yogini
23.  Niki Sayers, Silver Nik Nats
24.  Elsie Deliz-Fonseca, Eliz-Eliz and All That Craft
25.  Amber Dawn, Inventive Soul
26.  Heather Powers, Humblebeads
27.  Sarah Goode, Pookledo
28.  Monique Urquhart, A Half-Baked Notion
29.  JJ Jacobs, Coming Abstractions
30.  Cheri Reed, Creative Designs by Cheri


31.  Robyn, Museiddity
32.  Catherine King, Catherine's Musings
33.  Jacquie, Bead Gypsy
34.  Janet McDonald, Singing Woods
35. Kay Thomerson, Kayz Kreations
36.  Tanty Sri Hartanti, TJewellicious by Tanti
37.  Hannah Rosner, Good River Valley
38.  Rochelle Brisson, A Creative Chelle
39.  Nelly May, Smelly Nelly
40.  Skylar Bre'z, Brising Beads


41.  Beti Horvath, Stringing Fool
42.  Christie Murrow, Charis Designs
43.  Leanne Loftus, First Impression Design
44.  Valerie Norton, Hot Art
45.  Judy Riggs, Rigglettes
46.  Crystal Thain, Here Bead Dragons
47.  Terry Carter,  Tapping Flamingo
48.  Sue, Mid-Life Great Expectations
49.  Nan Smith, Wired Nan
50.  Miranda Ackerley, MirandAck Arts


51.  Marie Covert, Creating Interest
52.  D'Arsie Manzella, This Here Now, Mamacita
53.  Stephanie Haussler, Pixybug Designs
54.  Lori Bergmann, Lori Bergmann Design
55.  Johanna Nunez, The Lovely One Design
56.  Mary Govaars, MLH Jewelry Designs
57.  Becky Pancake, Becky Pancake Bead Designs
58.  Alicia Marinache, All the Pretty Things
59.  Debbie Rasmussen, A Little of This, A Little of That
60.  Nat, Grubbi Ceramics


61.  Marjorie Savill Linthwaite, Bennu Bird Rising
62.  Cheryl McCloud, One Thing Leads to Another
63.  Heather Otto, The Crafthopper
64.  Candida Castleberry, Spun Sugar Beadworks
65.  Tracie Dean, Dean Designs
66.  JuLee Wolfe, The Polymer Penguin
67.  Ginger Bishop, Lil Mummy Likes
68.  Karen Mitchell, Over the Moon Design
69.  Jeannie Dukic, Jeannie's Blog
70.  Dini Bruinsma, Angaza by Changes


71.  Birgitta Lejonklou, Create With Spirit
72.  Shalini Austin, Jewellery by Shalini
73.  Jayne Capps, Mama's Got to Doodle
74.  Ile Ruzza, Ilenia's Unique Beaded Jewelry
75.  Jackie Marchant, Fiddledeedee Jewelry
76.  Annita Wilson, AW Jewelry 
77.  Sherri Stokey, Knot Just Macrame
78.  Hannah Trost, PZ Designs
79.  Linda Inhelder, Must Haves Jewelry
80.  Miri Agassi, Beadwork


81.  Hope Smitherman, Crafty Hope
82.  Dyanne Cantrell, Dee-Liteful Jewelry Creations
83.  Susan Bowie, Susan Nelson Bowie
84.  Megan Milliken, MaeMaeMills
85.  Menka Gupta, Menka's Jewelry
86.  Ambra Gostoli, Chic and Frog
87.  Lori Lochner, Bloghner
88.  Gerda Jurimae, Gerda's Crafts Blog
89.  Susan, Mistheword
90.  MaryLou Holvenstot, MaryLou's time2cre8


91.  Mary Shannon Hicks, falling into the sky
92.  Karin King, The Sparklie Things Blog
93.  Christa Murphy, Adventures of One Beady Woman
94.  Jenny Davie-Reazor, Jenny Davies-Reazor
95.  Donetta Farrington, Simply Gorgeous
96.  Mallory Hoffman, Rosebud 101 - For the Love of Beads
97.  Danielle Kelley, Imbue the Muse
98.  Kym Hunter, Kym Hunter Designs
99.  Dolores Rami, CraftyD's Creations
100.  Marcia Dunne, 13 Alternatives


101.  Marlene Cupo, Amazing Designs
102.  Emma Todd, A Polymer Penchant
103.  Wendy Holder, Jewelry by WendyLea
104.  Michelle Escano, The Cabby Crafter
105.  Louise Glazier, Lily and Jasmine Treasures
106.  Dana Hickey, Wind Dancer Studios
107.  Lennis Carter, windbent
108.  Anne Betenson, Crystal River Beads
109.  Audrey Belanger,  Dreams of an Absolution
110.  Lisa Stukel, Carefree Jewelry by Lisa


111.  Janine Lucas, Travel Stories
112.  Claire Lockwood, Something to Do With Your Hands
113.  Kathy Engstrom, Catherine's Dreams
114.  Paula Hisel, Simply Beadiful
115.  Karla Morgan, Texas Pepper Jams
116.  Mischelle Fanucchi, Micheladas Musings
117.  Kim, Cianci Blue
118.  Linda Sadler, Ida Louise Jewelry
119.  Karen, Spokalulu
120.  Jennifer LaVite, Dry Gulch Bead and Jewelry


121.  Andrea Glick-Zenith, ZenithJade Creations
122.  Karen Martinez, Fairies Market
123.  Robin Reed, Artistry HCBD
124.  Amy Bright, LABweorc
125.  Jasvanti Patel, Jewels by Jasvanti
126.  Tammie Everly, TTE Designs
127.  Karin Slaton, Backstory Beads
128.  Natalie Moten, Running Out of Thread
129.  Sharyl McMillian-Nelson, Sharyl's Jewelry & Reflections
130.  Jenny Kyrlach, Wonder and Whimsy


131.  LiliKrist, Handmade by LilK
132.  Jessica Klaaren, The Truth Space
133.  Cynthia Abner, Created Treasures
134.  Beth Emery, Stories by Indigo Heart
135.  Heather Davis, Blissful Garden Beads
136.  Jeanne, Gems by Jeanne Marie
137.  Sandi Volpe, Sandi Volpe
138.  Laren Dee Barton, Laren Dee Designs
139.  Steph, Confessions of a Bead Hoarder
140.  Carolyn Lawson, Carolyn's Creations


141.  B. R. Kuhlman, Mixed Mayhem
142.  Patty Miller, Cabari Beads
143.  Elizabeth Bunn, Elizabeth Beads
144.  Marianna Boylan, Pretty Shiny Things
145.  Lizzie Clarke, The Need to Bead
146.  Christina Miles, Wings 'n' Scales
147.  Patricia, The Color of Dreams
148.  Marde Lowe, Fancimar
149.  Ev Shelby, Raindrop Creations
150.  Sarah Small, By Salla


151.  Perri Jackson, Shaktipaj Designs
152.  Laurie Vyselaar, Lefthand Jewelry
153.  Pam Traub, Klassy Joolz
154.  Lisa Harrison, Daisy Meadow Studio
155.  Anzia Parks, Anzi-Panzi's Work Shoppe
156.  Ingrid, Lilisgems Handcrafted Jewelry Inspirations
157.  Andra Weber, Andra's Joyful Journey
158.  Kelly Hosford Patterson, The Traveling Side Show
159.  Adlinah Kamsir, Dreamstruck Designs
160.  Marci, That Nothing Be Wasted


161.  Kris Lanae Binsfield,  Cherish Designs
162.  Stephanie Perry, Mustard Bead
163.  Birgit Klughardt, Gites Beads
164.  Inge von Roos, Inge's Blog
165.  Rebecca Sirevaag, Becca's Place
166.  Sandy Markley, Gypsy Spirit Designs
167.  Elena Adams, Lena's Beady Blog


Happy Hopping!
PZ

Wednesday, July 10, 2013

Embellished Filigree: A Showcase of Artists

After working a little with filigree for my last earrings, I was curious what other jewelry artists had done with filigree.  There are many wonderful layered designs out there, but the ones that really grabbed my interest were the ones that used beads to embellish the filigree.  Maybe it's because I love my beads and beadweaving techniques - and bead embellished filigree melds the two worlds nicely for me.  A bridge, perhaps, for me to cross in the future....

Here are some of the lovely designs and jewelry artists I found on Etsy:


And if you think bead embellishment is new, think again!  It's a revival from the past - here's just one example from the 1930s, possibly by Miriam Haskell, also available on Etsy:


There are many more embellished filigree designs out there, on Etsy and in other shops, both handmade and commercial.  I know I'm inspired, are you?

Happy Creating!
PZ

Monday, July 1, 2013

Fun with Filigree: My Earring Redesign

I was redoing photos of my jewelry when I noticed a pair of earrings that were a little sad - I thought they could be livened up with some additions or reworkings, but wasn't sure right then what to do with them. So I set them aside and finished my photos.

The Sad Earrings

I was a little lost as to what to add to them to make them more exciting and fresher.  I had just made some earrings with lots of dangles in a cluster, but I didn't want all my earrings to look like the same, so I scrapped that idea.  Next I thought about just taking them apart and remaking the entire design, but I liked the simple dangle still....

Cluster Earrings

After a couple more pairings, I decided on some fun filigree!  I don't work with filigree much, but I was inspired by some past magazines that I'd been rereading. I shaped the filigree with some soft waves and added them to the backs....

Filigree to the Rescue!

I think this redesign is fabulous!  The filigree added interest, movement, and length without overwhelming my original dangle or adding excessive weight.  Before you take something apart to rework it (which I do a bit of too....), maybe try adding some filigree or dangles or a splash of color to liven it up!

My current designs are available for purchase in my Etsy Shop, and I am happy to take custom orders!

Happy Creating,
PZ