
Some of you may ask why you'd want to remove the foil back from a crystal, especially one as nice as a Swarovski one! My answer to that question is this: I'm making a suncatcher and I want the sun to come through the crystals - and the shape, cut, color, and hole number that I wanted was only available at the time with a foil backing, from Swarovski.
Bumbershoot Designs and Supplies has a nice tutorial on removing foil backings from crystals using salt and vinegar. I thought this would work with any crystal, but the tutorial really is for vintage crystals. If you want to check it out: How to Remove Foil Backing from Vintage Glass Rhinestones and Cabochons.
After getting the crystals, I found out that Swarovski does such a great job applying the foil backings that they are very difficult to remove! Apparently Swarovski adds the foil during manufacturing and also applies a sealer over everything. This is great if you want backed crystals, but not so good for me.....
A little more research and I found this article from Benjamin's Crafts: Removing foiling from Swarovski Crystal. While helpful to some, I didn't want to buy harsh chemicals, let alone use them, nor did I want to pay someone to remove them for me. So I went a middle route.
MY TECHNIQUE
Please note that I used a tester piece and I'm glad I did! Removing the foil from a crystal can damage the crystal (as you'll see below) and/or change the crystal color - so please be careful and test at least one crystal before proceeding!
First - know that there are 3 layers to the foil backing. There is the sealant, the copper foil, and the silver mirror. This is important to recognize because each step will remove a different layer!
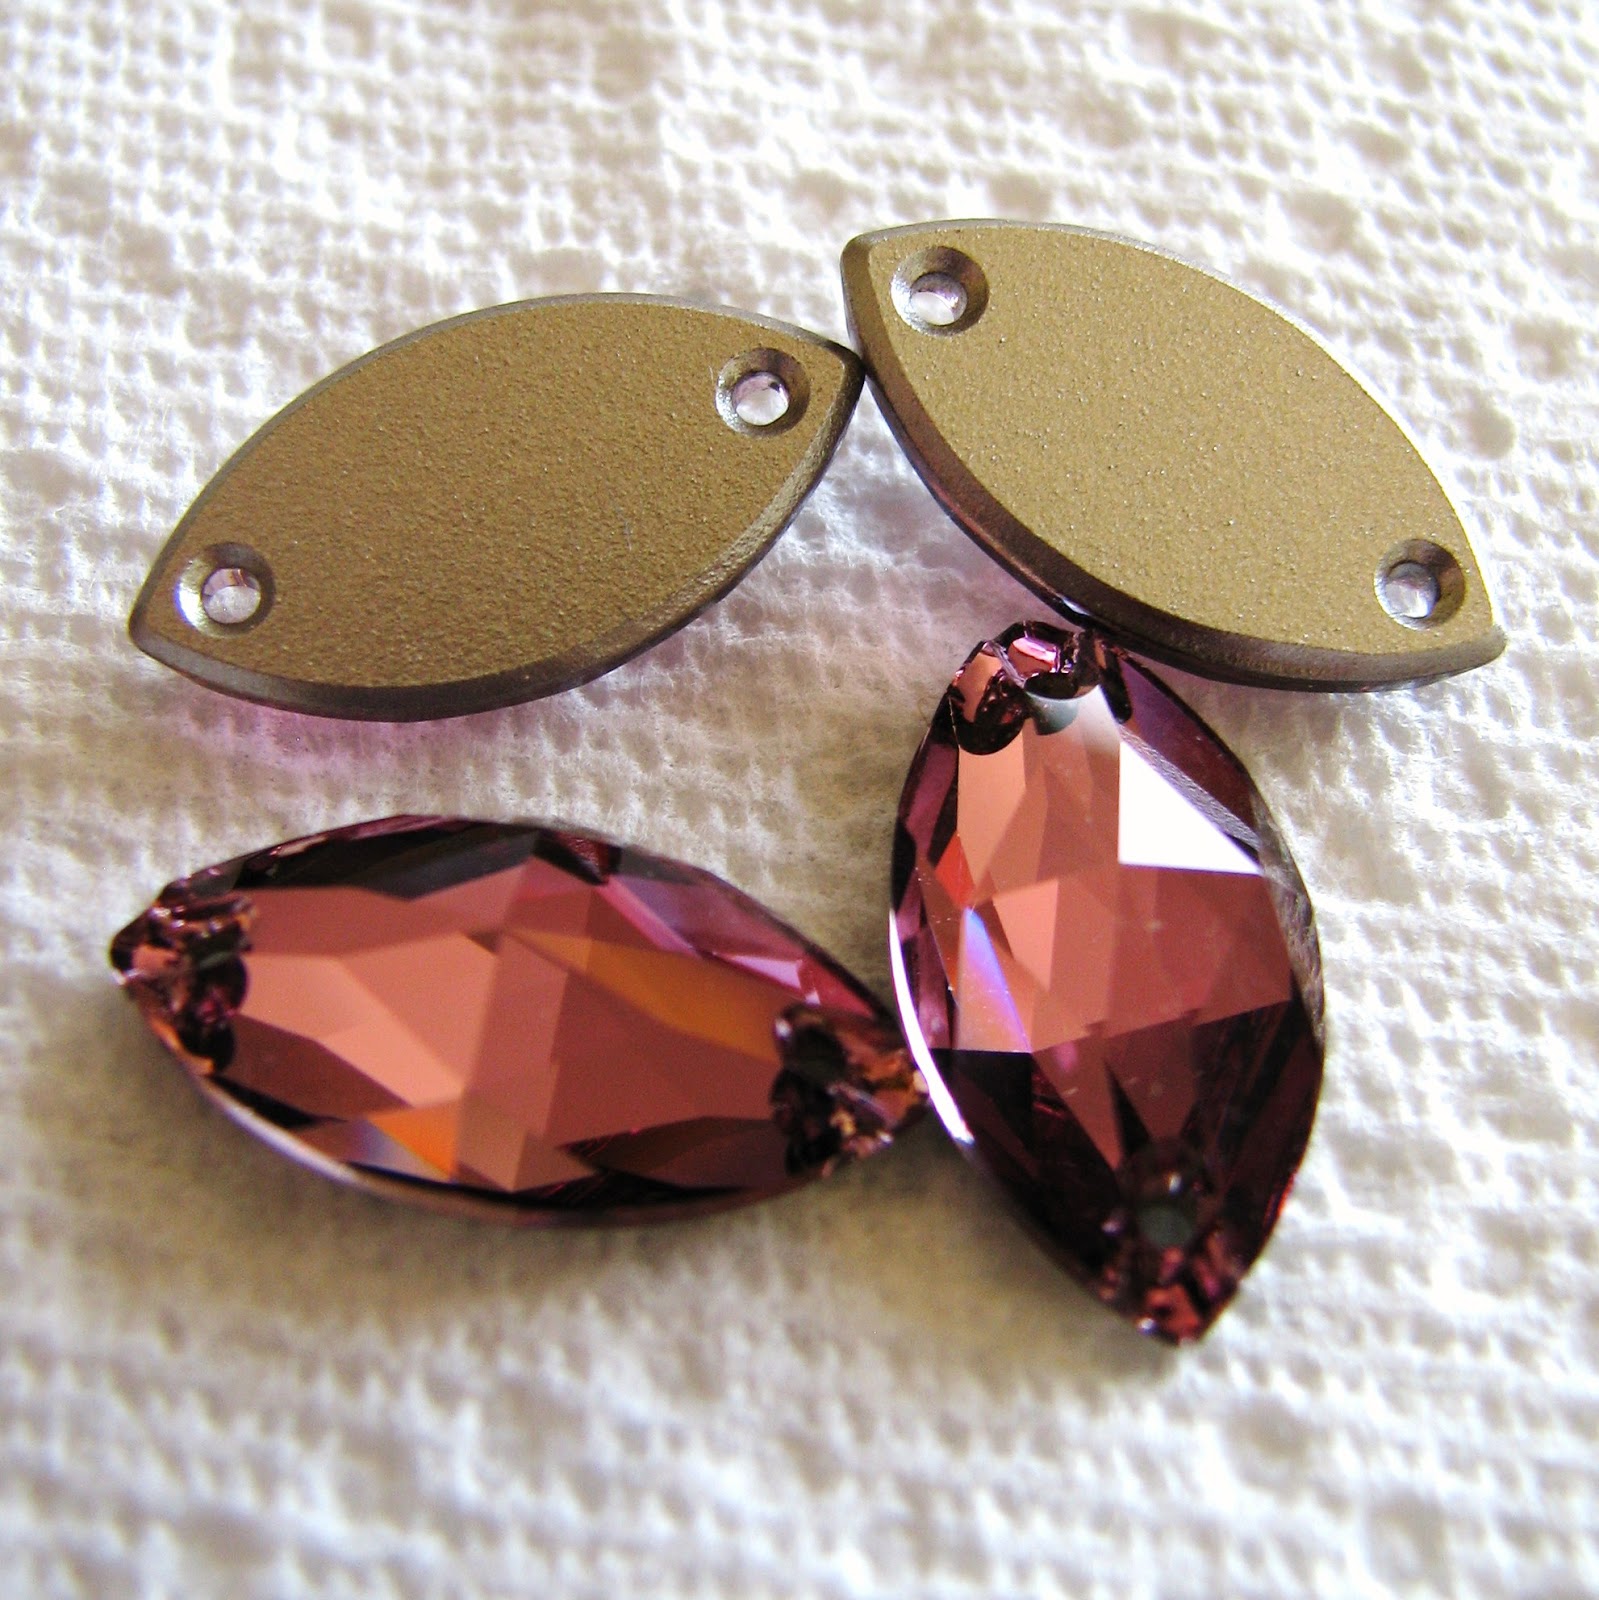
Swarovski flatback crystals with foil backing intact.
1) REMOVE THE SEALANT - Take fine sand paper and scratch the sealant. This allows the vinegar solution to penetrate the sealant to work on the next 2 layers.

Sanded crystals next to unsanded crystals.
Left photo = good sanding. Right photo = too much sanding.
- PLEASE be careful here - do not press too hard, check after each pass, and use a tester crystal! Scratch too deeply and you will scratch the crystal (I know, I did this...see above photos)! You will see the copper foil show through - stop here! If you scratch through to the silver layer, you are VERY close the scratching the crystal.

Sanded crystal.
Bottom half shows copper foil through sealant.
Top half shows silver mirror.
- I used 320 grit sandpaper. Between 280-400 should work. 280 is coarser - be more careful! 400 might need an extra pass or two.
- Lay the sandpaper on a flat surface and draw the crystal down the paper while holding both completely flat. Only draw it down 2-4 inches before checking. Twisting or angling either will result in deeper scratches along the crystal, possibly going to deep into the foil and scratching the crystal surface.
2) REMOVE THE COPPER FOIL - Make the dissolving solution and place the crystals in it for several hours.

Crystals soaking in the salt and vinegar solution.
- Solution: salt and vinegar.
- Any salt and vinegar will work. Coarse/kosher salt is often suggested to help scrub off the foil.
- Pour enough vinegar to cover the crystals. Add enough salt so that some remains undissolved.
- Soaking may take several hours. I soaked mine overnight and then some.
- Remove the crystals from the solution and rub with the salt, a soft cloth, or your fingernail (I used my nail - the point is to use something that won't scratch the crystal). The copper foil should chip/peel away.
- TROUBLESHOOTING - If nothing happened, try the sandpaper again. If a lot of copper remains, soak again, possibly overnight, again. Fresh vinegar may help.
3) REMOVE THE SILVER MIRROR - Sometimes the silver mostly comes off with the copper - then you are nearly done! If more than 1/4 of the silver remains, soak again. You may need to add fresh vinegar. A few hours worked for me - the silver was flaking off in the solution before I even re-rubbed them.

Crystals after soaking and rubbing - various amounts of silver remain on the crystals.
4) RINSE and POLISH - Stubborn silver remaining on the crystal can be cleaned off using a soft polishing cloth. I used a Sunshine polishing cloth and it worked great. Other cleaning solutions may work as well - use something mild that is meant to remove tarnish.

A polishing cloth will remove the remaining silver, leaving a lovely foil-free crystal behind!
5) Enjoy!

De-foiled crystals ready for my suncatcher!
FOR SCRATCHED CRYSTALS - Don't throw these away! These damaged crystals can be saved and used in other designs. I took my scratched crystal and scratch it some more! WHAT?!?!? Just check out the photos - using a fine grit sandpaper (320 again), I uniformly scratched the back of the crystal. The result is a matte back and a slightly milky look to the crystal from the front. While this crystal won't work for my suncatcher, it will work in other jewelry designs!

Re-sanded flatback crystal (bottom crystal in right photo).
The original scratches are sanded out, leaving a smooth matte surface on the back.
Happy Creating!
PZ
Hannah! Thank you ever so much for this post and tutorial! You have made it possible for me to create something that has been in my head and seemed it would remain there as only a dream - well now it can come to to fruition!!! I am so enthused! Thanks again Jay-Jay
ReplyDeleteThanks for posting this, exactly what I needed.
ReplyDelete